Lab 4.2: Prepare the Application Project
Keyboard Time: 20 mins, Automation Wait Time: 2 mins
Scenarios: Instructor-Led, Self-Paced
-
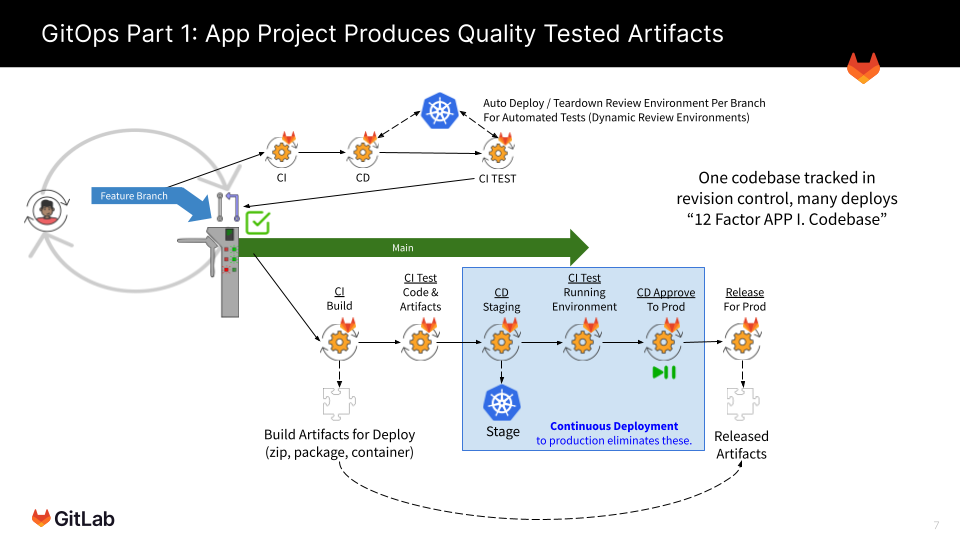
Create a GitOps Application Build project from a template.
-
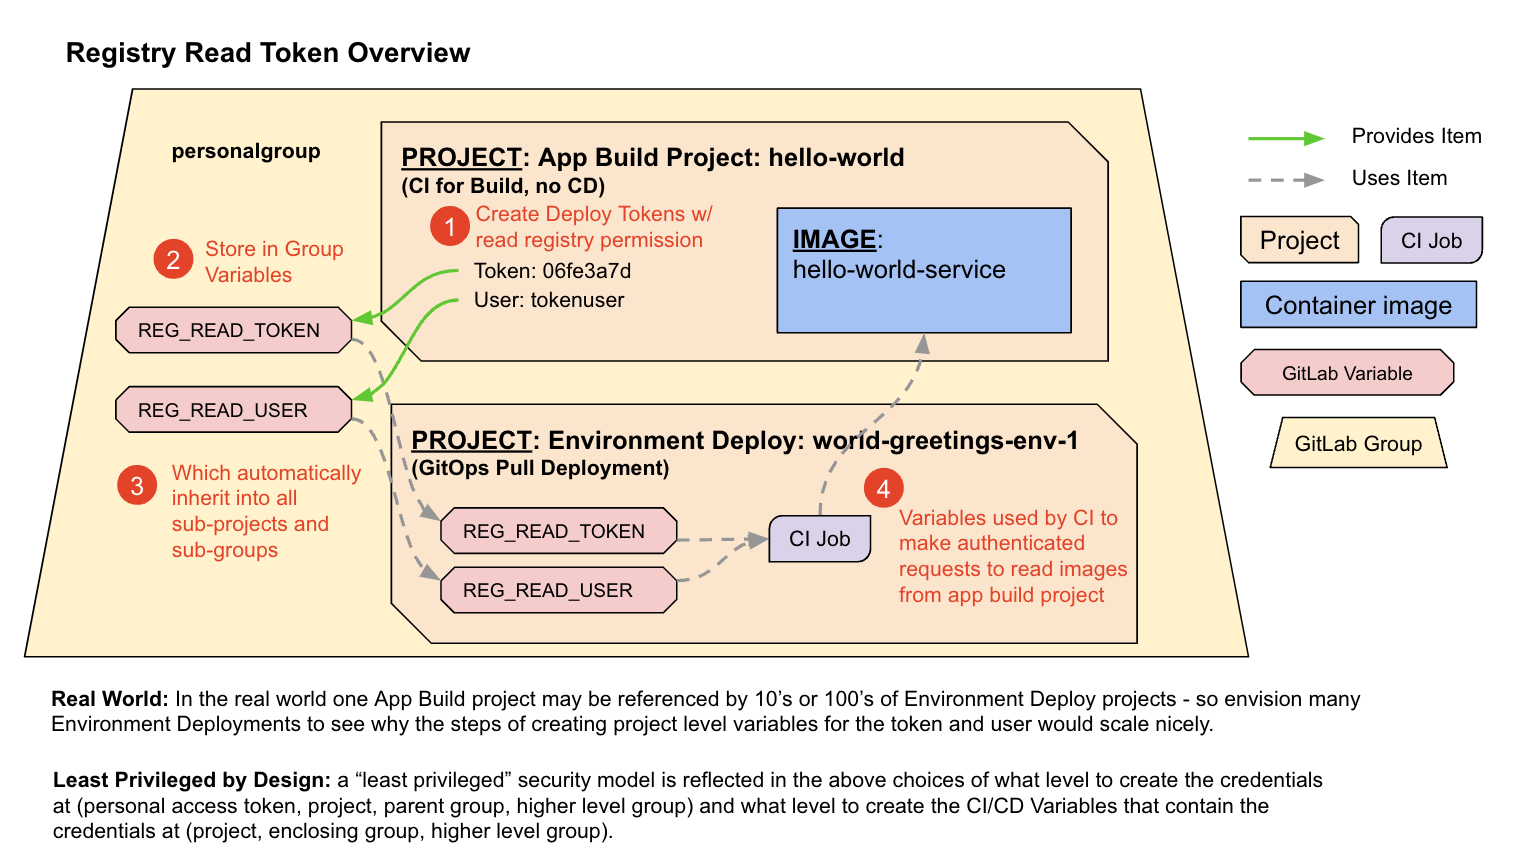
Create and publish (in a group CI/CD variable) a token that allows the Environment Deployment project to read the container images in the Application Build project.
the Load Balancer DNS Name and Load Balancer IP**.nip.io** have propagated through global DNS and wait (or troubleshoot) if they have not.-
While in ‘yourpersonalgroup’ (created in a prior lab) Click New project (button) and then Click Import project
-
On the ‘Import project’ page, Click Repository by URL
-
On the next page, for ‘Git repository URL’ Paste https://gitlab.com/guided-explorations/gl-k8s-agent/gitops/apps/hello-world.git
-
In ‘Project name’ Type Hello World (may already be defaulted to this)
-
Scroll down to ‘Visibility Level’
-
Click Public.
Must Be PublicProjects that are used by the GitLab Agent must be public when the agent registration is done in a project other than the one the deployment happens from and when the image being sourced is not using a stored docker login secret. -
Near the bottom of the page Click Create project (button)
-
On the left navigation bar, Click CI/CD => Pipelines
-
In the upper right of the page, Click Run pipeline (button)
-
On the ‘Run pipeline page’, leave the defaults and in the lower left of the page Click Run pipeline (button)
The code is designed to increment an image version from the container registry of your project. If no image is found, it starts at version 0.0.1.
-
[Automation wait: ~1 min] Wait for the pipeline to complete successfully.
-
On the left navigation panel, Click Packages & Registries => Container Registry
-
On the Container Registry page click the item ending in “/main”
You should see a version tag, a git short sha tag and a latest-prod tag that all have the same value for “Digest”
-
On the left navigation bar, Click CI/CD => Pipelines
-
In the upper right of the page, Click Run pipeline (button)
-
On the ‘Run pipeline page’, Change the value of the variable “NEXTVERSION” to 1.0.0 (replace the text ‘increment-existing-image-version’)
-
Click Run pipeline (button)
-
[Automation wait: ~1 min] Wait for the pipeline to complete successfully.
-
On the left navigation bar, Click Packages & Registries => Container Registry
-
On the Container Registry page click the [line item ending in “/main”]
Among the tags you should see a 0.0.1 version tag and a 1.0.0 version tag.
Note: the next time the pipeline runs it will increment 1.0.0 to 1.0.1 automatically because it will read the current version from the latest image.
This source project followed several specific principles that makes it this easy to use as a template:
- Soft codes most of the paths to be self referential to the project path name.
- When looking in the project container registry for the last image version, it handles an error in reading the container image as an indicator this is the first run and then forces the version number to 0.0.0 before it is incremented and a new container is generated. Subsequent builds then find the latest-prod image.
- Avoids use of the ‘latest’ tag as it is very common and might be created by other unknown build processes that are integrated later.
Create a Token To Read The Container Registry
-
While in ‘yourpersonalgroup/hello-world’ in the left navigation, Click Settings => Repository (button)
-
Next to ‘Deploy tokens’ Click Expand
-
Under ‘New deploy token’, for Name, Type ReadContainerRegistry
-
Under ‘Scopes (select at least one)’, Select read_registry (DO NOT SELECT read_repository)
-
Click Create deploy token
Page Reloaded With Update - Don’t CloseNotice the same page reloads, but at the top of the screen now has a grey box containing the token information.
IMPORTANT - Do not navigate to another page in this browser as this is the only time you can see the token. You will have to create a new token if you leave the page.
-
Use copy and paste to record the following in a temporary document (do not hand type tokens):
- READ_REG_USER = [user id from token generation UI]
- READ_REG_TOKEN = [token from token generation UI]
-
In a NEW browser tab, open ‘yourpersonalgroup’ (the group level - not the hello-world project)
-
On the left navigation, Click Settings => CI/CD
-
To the right of ‘Variables’, Click Expand
-
Click Add variable
-
For Key, Type READ_REG_USER (it is usually best to copy this name from this exercise rather than type it)
-
Copy the Value for READ_REG_USER from your temporary document, Paste [the Clipboard contents]
-
Under Flags, Deselect Protect variable
-
Click Add variable (button)
-
Click Add variable (button on page - this is not a duplicate instruction)
-
For Key, Type READ_REG_TOKEN (it is usually best to copy this name from this exercise rather than type it)
-
Copy the Value for READ_REG_TOKEN from your temporary document, Paste [the Clipboard contents]
-
Under Flags, Deselect Protect variable
-
Under Flags, Select Mask variable
-
Click Add variable
You should now have two variables in ‘yourpersonalgroup’ that contains READ_REG_USER and READ_REG_TOKEN with the values from the Deploy Token creation.
-
Create a GitOps Application Build project from a template.
-
Create and publish (in a group CI/CD variable) a token that allows the Environment Deployment project to read the container images in the Application Build project.